Chapter 9
Detector Description
9.1 Overview
In this chapter we describe how we make available to the physics application developed using the framework the information related to the detector that resides in the detector description database (DDDB). The DDDB is the persistent storage for all the versions of the detector data needed to describe and qualify the detecting apparatus in order to interpret the event data.
The final clients of the detector description are the algorithms that need this information in order to perform their job (reconstruction, simulation, etc.). To provide this information, there needs to be a sub-detector specific part that understands the sub-detector in question and uses a set of common services. The detector description we are providing in Gaudi is nothing else than a framework for developers to provide the specific detector information to algorithms by using as much as possible common or generic services.
In the following sections we begin with an overview of the DDDB. We then discuss how to access the detector description data in the Gaudi transient detector data store. This is followed by a discussion of the logical structure of the Gaudi detector description. We then describe in detail how the detector description can be built and made persistent using the XML markup language and finish with an introduction to an XML editing tools which allows browsing and modification of the DDDB.
9.2 Detector Description Database
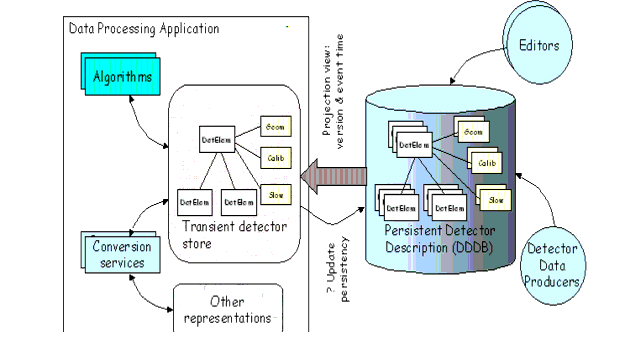
The detector description database (DDDB), see Figure 9.1, includes a physical and a logical description of the detector. The physical description covers dimensions, shape and material of the different types of elements from which the detector is constructed. There is also information which corresponds to each element which is actually manufactured and assembled into a detector, for example the positioning of each element. Both active and passive elements should be included. The description of active elements should allow for the specification of deficiencies (dead channels), alignment corrections, etc. and also detector response characteristics, e.g. energy normalization in calorimeters, drift velocity in gas chambers.
Figure 9.1 Overview of the Detector Description model.
The logical description provides two main functions. The first is a simplified access to particular parts of a physical detector description. This could be a hierarchical description where a given detector setup is composed of various sub-detectors, each of which is made up of a number stations, modules or layers, etc. and there would be a simple way for a client to use this description to navigate to the information of interest. The second function of the logical description is to provide a means of detector element identification. This allows for different sets of information which are correlated to specific detector elements to be correctly associated with each other
In a detector description, the definition of the detector elements and of the data associated to their physical description may vary over time, for instance due to real or hypothetical changes to the detector. Each such change should be recorded as a different version of the detector element. Additionally, it should be possible to capture, for an entire description, a version of each of the elements and to associate a name to that set. This is similar to the way CVS allows one to tag a set of files so that one does not need to know the independent version numbers for each file in the set.
The current implementation of DDDB includes only the logical description of the detector, its geometry and the description of the required materials. We are actively working in incorporating the so called Conditions Database, which will include the rest of the time varying detector information (calibration, alignment, slow control, etc.).
9.3 Detector Data Transient Store
9.3.1 Structure of the transient store
The transient representation of the detector description is implemented as a standard Gaudi data store. Refer to Chapter 7 for general information on how to access data in stores. The structure of the detector transient store is represented in Figure 9.2. There are various branches in the hierarchical tree structure and probably there will be more of them defined in the future.
At present there are three top level catalogs in the transient store. The main catalog, called "Structure" contains the logical structure of the detector identified by the "setup name" i.e. "LHCb" containing the description of the detector and this catalog is used for identification and navigation purposes. Other catalogs are the palette of logical volumes and solids, called "Geometry", used for the geometry description and the palette of materials, called "Materials", used to describe the material properties of the solids needed for the detector simulation, etc.
9.3.2 Accessing detector data
Figure 9.2 The structure of part of the LHCb detector data transient store.
An algorithm that needs to access a given detector part uses the detector data service to locate the relevant DetectorElement. This operation can be generally done during the initialization phase of the algorithm. Contrary to the Event Data, the Detector Data store is not cleared for each event and the references to detector elements remain valid and are updated automatically during the execution of the program. Locating the relevant detector element is done using the standard IDataProviderSvc interface via the detSvc() accessor as shown in Listing 9.1
Similarly the user can retrieve an array of such references. The following code fragment can be used to prepare an array with pointers to all of the Muon stations. Here we use an STL vector of pointers to DeMuonStation objects to store the retrieved Muon stations.
9.3.3 Using the DetectorElement class
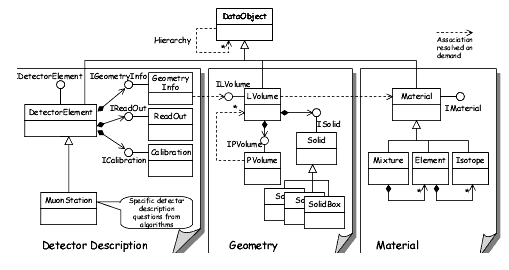
The DetectorElement class implements the IDetectorElement interface, as shown in Figure 9.3. Currently, only the geometry() accessor method is implemented. The rest of the interface will be implemented in the next releases of the detector description package. In addition, DetectorElement implements the IValidity interface. This interface is used to check if the detector element is synchronized with the current event. If the detector element contains information no longer valid at the time the current event was generated, its content must be updated from the persistent storage. In the current implementation it is not foreseen for end users to use this interface directly.
Figure 9.3 Simplified class diagram for the transient detector description
The accessor method geometry() gives access to geometry information offered by the interface of type IGeometryInfo. This interface allows the retrieval of a reference to a logical volume associated with the given detector element, its material property, the position in the geometrical hierarchy. In addition to that you can ask it questions like:
1. Transformation matrix from the Global to the Local Reference system
2. Transformation matrix from the Local to the Global Reference system
3. Perform transformation of point from the Global to Local Reference system
4. Perform transformation of point from the Local to Global Reference system
5. Name of daughter volume (of current volume) which contains given (global) point
6. Get a pointer to daughter volume which contains given (global) point
7. Name of daughter volume (at deeper hierarchical level) which contains given point
8. Get a pointer to daughter volume (on deeper level) to which contains given point
9. Get the exact full geometry location1
10. Whether the given point is inside the associated logical volume or not
11. A pointer to the associated logical volume
For example the code fragment in Listing 9.3 shows how to obtain a number of geometrical objects from a given detector element:
9.4 General features of the geometry tree
The construction of the geometry tree within the Gaudi framework is based on the following postulates:
· The geometry tree is constructed from Logical Volumes and Physical Volumes.
· There are no "up-links" in the geometry tree. It means that each node has no information about the "up" (or "parent", "mother") node.
· Each Logical Volume has a information about its "down" ("children") nodes, represented by Physical Volumes
· Each Logical Volume has information about its shape and dimensions ("Solid").
· Each Logical Volume has access to information about the material content.
· Neither Logical Volumes nor Physical Volumes have any information about their absolute position in the space.
· Logical Volumes have no information about their own position relative to other Logical Volumes.
· Each Physical Volume has a information about its position inside the mother ("parent") Logical Volume. This is the only geometry information available in the whole tree.
· All boolean operations on Logical Volumes and Physical Volumes are strictly forbidden2. Boolean operations should be performed at the level of Solids. This is one of the most essential postulates of the Gaudi geometry structure.
The geometry tree which fulfils all these postulates represents a very effective, simple and convenient tool for description of the geometry. Such a tree is easily formalized. It has many features which are similar to the features of the geometry tree used within the Geant4 toolkit and could easily be transformed to the Geant4 geometry description.
Some consequences of these postulates are:
· The top-level Logical Volume (presumably the experimental hall, or cave, or the whole LHCb detector) defines the absolute coordinate reference system. In other words, the null-point (0,0,0) in the so called Global Reference System is just the center of the top Logical Volume.
· All geometry calculations, computations, inputs and outputs, performed with the usage of a Logical Volume are in the local reference system of this Logical Volume.
· All geometry calculations, computations, inputs and outputs, performed with the usage of a Physical Volume are in the local reference system of its parent Logical Volume.
Sometimes one needs a more efficient way of extracting information from the geometry tree or to compute the unique location of a point in the geometry tree. For these purposes, a simplified detector description tree is introduced into the Gaudi framework3.
The next subsections give brief details of the implementations of Logical Volumes, Physical Volumes and Solids in Gaudi. More detailed documentation can be found at http://cern.ch/lhcb-comp/Frameworks/DetDesc
9.4.1 Logical Volumes
The notion of Logical Volume is implemented in Gaudi by the class LVolume. LVolume is an identifiable object and therefore inherits from class DataObject and can be identified in the transient data store by a unique name (its "path"). It implements the ILVolume and IValidity interfaces.
9.4.2 Physical Volumes
The notion of Physical Volume in the Gaudi geometry is extremely primitive, it is just a Logical volume which is positioned inside its mother Logical Volume. It consists of the name of the Logical Volume to be positioned, together with the transformation matrix from the local reference system of the mother Logical Volume to the local reference system of the daughter Logical Volume. This is implemented in Gaudi by the class PVolume. PVolume is not identifiable and implements the IPVolume interface.
9.4.3 Solids
All solids implement the ISolid interface. Currently, five types of "primitive" solids are implemented: Boxes, Trapezoids, Tube segments, Conical tube segments, Sphere segments and General trapezoids. These were chosen from the most frequently used shapes in the GEANT3 and Geant4 toolkits - more shapes can be implemented if necessary. In addition, Boolean Solids have been defined, which allow Subtraction, Union and Intersection operations on solids, to build complex shapes.
9.5 Persistent representation
The Gaudi detector description is based on text files whose structure is described by XML (eXtendable Markup Language), a standard language which allows the definition of custom tags, unlike the fixed set of tags of HTML used for WWW. XML files are understandable by humans as well as computers. Data in XML are self-descriptive so that by looking at the XML data one can easily guess what the data mean. Unlike the HTML tags, tags in XML do not define how to render or visualize the data. This is left to an application which understands the data and can visualize them if wanted. An advantage of XML is that there exists plenty of software which can be used for parsing and analysing, as it is an industry standard.
In the future we expect to replace the text files by an object persistency based on an object oriented database, for example ObjectivityDB, but the data will continue to be described in XML.
9.5.1 Brief introduction to XML
9.5.1.1 XML Basics
XML is extendible, meaning that a user can define his own markup language with his own tags. The tags define the meaning of the data they represent or contain. They act as data describers. For example, Listing 9.4
At first look this markup language looks like screwed-up HTML. This is because both HTML and XML have their roots in SGML, but they are used for different purposes. From the example above it's not clear how to present the data described there nor how to visualize them. What is clear however is the meaning of the data items encoded in XML. Thus one can easily recognize the data items and guess what they mean. On the other hand it is relatively easy to instruct a computer program what to do with the given data item according to the XML markup elements it is encapsulated in. Let us analyse the example shown above.
9.5.1.2 XML components
XML declaration
must be at the beginning of each XML document. It is the first line in the example. It says that this file is an XML file conforming to the XML standard version 1.0 and is encoded in UTF-8 encoding. The encoding is very important because XML has been designed to describe data using the Unicode standard for text encoding. This means that all XML documents are treated as 16 bit Unicode characters instead of usual ASCII. So, even if you write your XML files using 7 or 8 bit ASCII, all the XML applications will work with it as with 16 bit Unicode XML data. The encoding information is important, for example when an XML document is transferred over the Internet to some other country where a different encoding is used. If the receiving application can guess the XML encoding from the received file, it can apply transcoding methods to convert the file into proper local encoding, thus preserving readability of the data.
XML comments
look like comments in SGML or HTML. They start with <!-- and end with -->. Comments in XML cannot be nested.
XML elements
are the markup components describing data in XML. In the example we had the following XML elements: Email, TimeStamp, Sender, Recipient, Subject, Body, Signature. The very basic and mandatory rule of XML is that all XML element tags must nest properly and there must be only one root XML element at the top level of each XML document, which contains all the others. Proper nesting means that each XML element has its opening and closing tag and the closing tag must appear before the parent element's closing tag, as shown in Listing 9.5. Following these rules one can always produce well-formed XML documents.
XML elements can have attributes and a content. Attributes usually describe the properties of the given element. The value of the attribute follows the assignment operator and is enclosed inside double or single quotes.In the content can appear text data or other properly nested elements. The text data and nested elements can be mixed inside the content.
9.5.1.3 Well formed versus Valid XML documents
A well formed XML document is any XML document which follows the rules described in the previous section. However this is not sufficient in some cases. Inside an XML document you can have any XML tag you can imagine. This is not harmful to XML itself but makes it impossible to process such a document with a computer program and makes it very hard to maintain the program to keep it synchronised with all the new tags users invent. For a well formed XML document is not possible to check or validate that the document contains only the tags which make sense or have valid content. For that purpose there exists a notation called Document Type Definition (DTD) which comes from SGML world. This notation permits the definition of a grammar (a valid set of tags, their contents and attributes) which allows then to perform the validation of XML documents, i.e. whether the document contains the XML tags which belong to the set of tags defined by its associated DTD. In addition, the validating application can check whether the tags contain only allowed tags or text data, and whether the tags use only attributes defined for them by the DTD. The validation process can can also perform normalization of attributes, i.e. assign default values to attributes that the user has omitted because they are described as optional or with a fixed value in the DTD.
Important note: the default behaviour of the validating application, recommended by the XML standard, is to stop parsing of an XML document in case of an error. This is because the XML files describe data and an error in XML means corrupted data.
9.5.2 Working with the persistent detector description in XML
In this section we describe how to create or update the XML data files used by the detector description database. We will go through all available XML elements defined for the detector description, explain their XML syntax and show how to use them.
9.5.2.1 Defining the top level structure
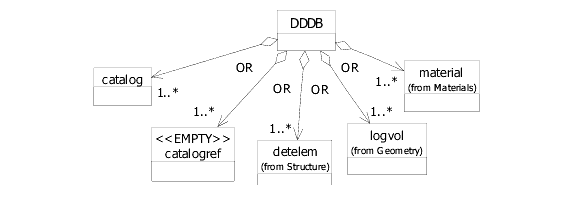
To fulfil the XML basic rule that each XML document must have only the one root XML element we have defined the element DDDB, see Figure 9.4.
Figure 9.4 Content model definition of the root element for detector description
This element must be present in each of the XML files created for the detector description. This element is so defined that it can contain all the important elements needed for detector description and thus the database can be spread over multiple XML files. The DDDB element can contain one or more of the following elements: catalog, catalogref, detelem, logvol, material. Each of these elements will be described in detail later
The detector description in XML requires a bootstrap file which contains a definition of the database root and a definition of the top level catalogs mentioned above. This done in a flexible way to make it possible to have multiple bootstrap files. This can be done in the job options by setting the application manager properties DetDbLocation and DetDbRootName. They allow to switch from one bootstrap file to another and to switch between root nodes. The bootstrap file must have defined the root node catalog as the only child of the DDDB element. Inside the root node catalog the top level catalogs can be defined according to the required content. See Listing 9.6 for an example.
In the example, the root nodes catalog /dd and its three top level catalogs for logical detector description, geometry and materials are defined. Note that the catalog and catalogref tags have not specified the classID attribute. This shows how the validation can reduce the amount of the text in XML because these values are automatically included after the document has been validated against the DTD file structure.dtd specified in the DOCTYPE section.
The catalog and catalogrefs are used as bookshelves or references to bookshelves respectively to achieve a possibility to split the XML database into logical partitions. The catalogref element acts as forward reference saying where to find the given catalog definition. This tag is one of the XML references defined for the detector description. All of them have almost the same usage and syntax. The common things they have are attributes for class ID and hyperlink reference. The hyperlink is in general specified using the format:
The protocol and hostname parts can be omitted if the file resides on the local host. It is possible to write a hyperlink without the full path name in case one needs to refer to an XML object residing inside another file. In this case the relative path will be appended to the location of the currently parsed XML file.
For example having the current file location /full/path/to/current.xml and inside this file a hyperlink as href="next/file.xml#NextOID" the hyperlink will be resolved as /full/path/to/next/file.xml#NextOID.
If the hyperlink has the form #ObjectID this means that the referred object is located in the same file.
9.5.2.2 Defining detector elements
The detelem element has a sequence of tags (author, version, geometryinfo, detelemref, specific). The child elements author, detelemref and specific are optional so if they are not present the content is still valid.
Listing 9.7 shows the XML definition of the ECAL detector containing the author of this definition, the version, geometry information about the associated logical volume and three sub-detectors of the ECAL detector.
The example shows that the definition of the Ecal sub-detectors can be found in the file ecal.xml. The standard class ID for detector element is 2, but here the class ID is set to 8900, which means that this sub-detector is customized by the user and contains specific information, in which XML tags to describe specific features the detector have been defined by the user. The customizing of detector elements is described in section 9.5.3.
The geometryinfo element definition says that the Ecal detector has an associated logical volume with the given name on the transient store. The logical volume should be defined somewhere else in the XML and is retrieved automatically when the user asks for it via the IGeometryInterface returned by the geometry() accessor method. The two other attributes in the geometryinfo are the supporting detector element and its path. The supporting detector element is one of the parent detector elements sitting on the same branch in the logical detector description hierarchy. It can be a direct parent or a detector element 3 levels up. Its role is to help in finding of physical volume location in the geometry hierarchy for the detector element which is referring to it. The path is a sequence of names or numbers which is used by the algorithm looking for the physical volume location in the geometry hierarchy. This is the sequence which must be followed from a logical volume of supporting detector elements down through the hierarchy. If it is in numeric form (rpath) then it must start counting from 0. If it is in the literal form (npath) it can be a text label but it must be unique inside the mother logical volume where it is defined and used. This label is internally converted into its proper numeric equivalent at run-time.
9.5.2.3 Defining logical volumes
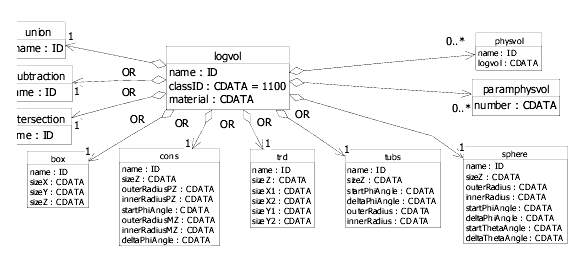
To define a logical volume in XML the logvol element is used, see Figure 9.5.
Figure 9.5 Content model definition of logvol element
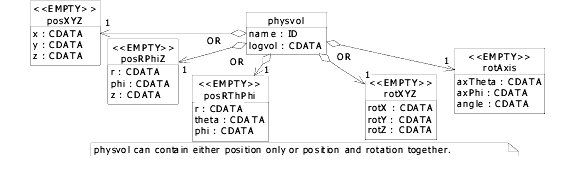
The complete logical volume definition includes the name of the logical volume, its material, its solid (shape) and the list of daughter volumes represented by physical volumes or parametric physical volumes. The content model definitions of physical and parametric physical volumes is shown in Figure 9.6 and Figure 9.7. Listing 9.8 shows an example of a logical volume in XML.
Figure 9.6 Content model definition for physical volume element.
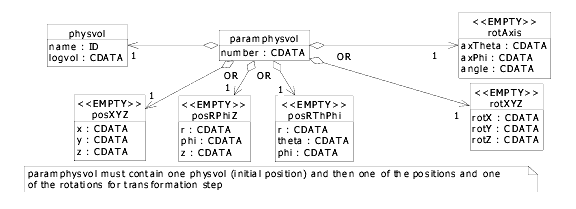
Figure 9.7 Content model definition for parametric physical volume element.
The example shows two logical volumes lvLHCb and lvVertex. The former volume is made of the material Vacuum and its solid is defined as a box with dimensions 50 x 50 x 60 meters. Then it has ascribed one daughter volume lvVertex positioned inside the lvLHCb volume without rotation and shifted along the z-axis by 200 millimetres. The lvVertex volume is made of material Silicon and its shape is defined by the solid tubs (cylinder) and has one parametric physical volume which places 6 daughter volumes of lvVStation.
The initial position of the first daughter volume is placed 200 millimeters backwards along the Z axis relative to the center ofthe lvVelo mother volume. The remaining daughter volumes are then shifted by 50 millimeters along Z axis one by one relative to the previous one without rotation.
Simple solids
Simple solids are based on the concept of Constructive Solid Geometry (CSG). This concept is nothing new, it has been used already by GEANT3 and Geant4 and by the other frameworks. There are defined the solids of the basic 3D volumes such as sphere, box, cylinder, conus, toroid...
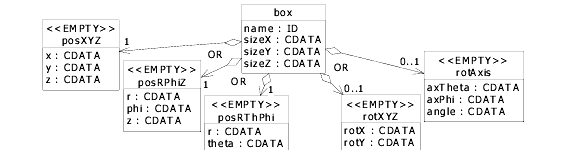
The solid definition is fundamental property of a logical volume object and thus is needed to capture this information inside XML as well. For that purpose there are defined the XML tags for the solids of the basic 3D volumes such as sphere, box, cylinder, conus, toroid... The diagram in Figure 9.8 shows the content model definition of the simple solids. An example of XML is shown in Listing 9.9. Note that simple solids cannot contain position and rotation definitions in the context of logical volume. When used inside logical volume the transformation makes no sense. On the other hand when used in the context of boolean solids the transformation tags are needed in order to specify the position of the solids according to each other.
Boolean solids
Figure 9.8 Content model definition of the box XML element (applies to all simple solids).
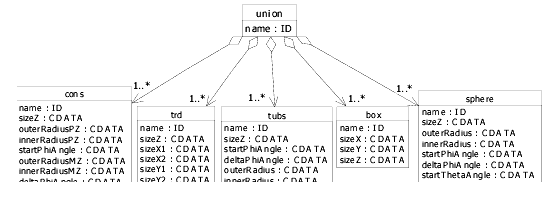
The current implementation allows to create boolean solids as a union, intersection or subtraction of several simple solids. The content model is shown in Figure 9.9
Figure 9.9 Content model definition of a union boolean solid (applies to all boolean solids).
The user has to start with the so called main solid and all the other solids participating in the boolean solid are positioned relative to the main solid. In this context the position and rotation attributes of solids are applied together with their dimensions attributes. Listing 9.9 shows how to create a simple union of solids.
The example shows the union of two boxes where the first one is the main solid and the second one is positioned just next to the main solid along the z-axis.
9.5.2.4 Defining Parameters and Units
As has been shown in the previous examples, numeric values in the XML files can be built from simple mathematical expressions using user defined parameters and standard units. User parameters are defined using the XML element parameter anywhere in the detector or geometry hierarchy. The parameter name is global to the system, therefore a naming convention should be put in place to avoid clashes. The value of a parameter may include other parameters or units as shown for example in Listing 1.
9.5.2.5 Defining materials in XML
Material is another important attribute of the logical volumes. Materials can be defined as isotopes, elements or mixtures. The elements can be optionally composed of isotopes. Mixtures can be composed of elements or of other mixtures. Composition of elements is done always by specifying the fraction of the mass for each of the isotopes of the element. For a mixture the user can specify either composition by number of atoms of by fraction of the mass for each of the elements or mixtures. It is not allowed to mix composition by fraction of the mass and by atoms inside the same definition of a mixture.The XML code listings 9.1, 9.2, 9.3 and 9.4 show how to define Gaudi isotopes, elements and material compounds and mixtures in XML
9.5.2.6 Defining tabulated properties
For the Geant4 simulation, in particular for the Cherenkov radiation, we need to associate optical properties to materials. This is done by defining a TabulatedProperty, which consist on an ordered set of pairs (x, P(x)). An example of associating a tabulated property to a material is shown in Listing 9.4. In this case the tabulated property WaterRefractionIndex associated to the Water material is defined somewhere else in the Material catalog as is shown in Listing 2. Notice that the there are two ways for introducing the value pairs.
9.5.3 Customizing a detector element
The specific detector description can be made available to algorithms by customizing the generic detector element. Customizing is done by inheriting the specific detector class from the generic DetectorElement. The sub-detector specialist can provide specific answers to algorithms based on a combination of common parameters (general geometry, material etc.) and some specific parameters. For example, an algorithm may want to know what are the coordinates of a given cell or wire number in the local reference system. The specialist can "code" the answer by using a minimal number of parameters specific to the detector structure.
Step 1: Define your detector element type
This means providing the C++ definition of your specific detector module, as shown in Listing 9.1. The actual implementation of all the methods is done inside MyDetector.cpp file.
At first the user must obtain the unique class ID for his/her own detector element type. The class ID is needed for conversion service and the corresponding converter. The methods returning the class ID must be supplied exactly as shown in the example.
The example shows further that the new detector element type will have its specific data, e.g. detector cell size. For this information we will create a user defined XML tag inside the <specific> section of detector element XML tag, see the next step.
Step 2: Define your detector element in XML
In this step one needs to define all the new XML tags for the detector element specific data that the user wants to access from the XML data file. The definition of the new XML tags is done inside the, so called, local DTD section. This is needed for validation purposes. With this definition, the XML parser is then able check whether the syntax of the user defined XML tags is valid or not. The next step is to provide information about the geometry. Actually here we do not do the full geometry description, but only create the association telling the converter where to look for full geometrical information about this detector element. The definition of the geometry is shown at the next step. Finally the user has to define sub detectors or sub modules if any. An example XML definition of the MyDetector element type is shown in Listing 9.2, in which two new XML tags are defined: AluminiumPlateThickness and CellSize. They are the used inside the <specific> section filled with the concrete data
The CellSize tag is defined as an empty tag with one attribute "n". The tag AluminiumPlateThickness has no attribute but has content. In step 4 we will show how properly retrieve information out if these tags by methods of a user defined XML converter.
Step 3: Define the geometry of your detector element.
In the previous step the association to the geometry has defined, but the actual geometry does not exist yet. This step will fill the gap by providing all the needed information in XML.
First we define the catalog of all the logical volumes of MyDetector, as shown in Listing 9.3. This catalog is accessible at run-time as /dd/Geometry/MyDetector. Such a catalog allows modification of the XML detector description database by many people in parallel, because all the changes to the geometry structure inside this catalog can be kept local to this catalog without affecting the other subdetectors. It also makes the structure on the transient store more clear and similar to the logical structure of the detector. The catalog contains only references to logical volumes defined in the same file.
Next we have defined the logical volume for our MyDetector element with its shape as box and 3 daughter volumes. The first two daughter volumes are represented by parametric physical volume and the third one by normal physical volume.
The definition of the remaining two logical volumes is missing from Listing 9.3, but these are defined in a similar way to the one shown.
Step 4: Write the XML converter for your detector element.
As a first step we need to create instance of the user level XML converter for MyDetector element type. This done by inheritance from XmlUserDeCnv<> templated class which is parametrized by our MyDetector element type, see Listing 9.4..
What is important here is to define the corresponding converter factory otherwise this converter will not be invoked.
As the next step is actual implementation of the callbacks of the IUserSax8BitDocHandler interface. This interface is defined as shown in Listing 9.5.
The names of the methods are self descriptive but two of them may need more detailed explanation. The methods uIgnorableWhitespace and uCharacters are called for #PCDATA contents of an XML tag. The reason why there are two methods instead of one is that the XML specification says that white characters inside XML documents are preserved and the decision is left up to the application which should either ignore them or process them.
Let us move back to writing our XML converter. The uStartElement is called always when XML parser jumps onto the next XML tag inside the <specific> section. The implementation of this callback is shown in Listing 9.6.
There is a clear action there for the tag CellSize. We get the value of the attribute "n" by name and we evaluate its content by numerical expressions parser with checking for CLHEP units enabled and finally we set the m_cellSize property of our detector element.
For the tag AluminiumPlateThickness, however, we can't do much at this time because its content has not been parsed yet. What we do here is initialization of the static variable used to collect all of the characters inside the content of the AluminiumPlateThickness tag.
Listing 9.7 shows how we process #PCDATA content of our XML tag by collecting all of the characters and inside the uEndElement callback we finally evaluate the string expression we have collected and set the corresponding property of our detector element.
9.5.4 Numerical expressions parser
The framework provides a simple evaluator of numerical expressions based on the CLHEP expression evaluator. It is available for Gaudi framework converters as well as for the user defined converters. The only difference is that in user defined converters the parser is not instantiated explicitly by the user but is accessed through the IXmlSvc interface instead.
The numerical expressions recognized by the parser can be composed of integers and floating point numbers assuming one of the formats:
Supported operations are: + - * / unary +|- exponent ^
Parenthesized expressions: 1.4 * (23.4-e12 / 1.8)
Operator precedence is: () unary +|- ^ *|/ +|-
In addition, the parser understands CLHEP units. The result is always evaluated to double value. The check for the presence of CLHEP units inside expressions is enabled by default. To suppress this behaviour the call of the eval() method must look like:
9.5.5 XML Editor
The XML editor is a tool provided to edit the XML files of the detector description database without having to learn the XML syntax. It is provided as a separate Gaudi package and was written in Java. Documentation is available at http://cern.ch/lhcb-comp/Frameworks/DetDesc.
1 This operation can be time consuming!
2 This is equivalent to the absence of the 'MANY' flag in the GEANT3 toolkit.
3 Within the Geant4 toolkit there exist two approaches for solving the same problem: Read-Out-Geometry Tree and Navigator. Our approach is quite close to the combined usage of both.
|
Quadralay Corporation http://www.webworks.com Voice: (512) 719-3399 Fax: (512) 719-3606 sales@webworks.com |